Installation
To start, please make sure Matlab has already been installed in your computer. You also need to setup the C compiler. Start Matlab, in the Matlab command window, issue the following command to choose a compiler:
mex -setup
Choose gcc for Linux and Lcc-win32 for 32 bit MS-Windows. If you have 64 bit MS-Windows, a C compiler must be installed separately on your machine, for instance MinGW-w64. Choose the C compiler that has been installed in your machine.
Please download nanodcal-version.tar.gz and neutralatomdatabase.tar.gz
from the client portal of Nanoacademic. Suppose
NanoDCAL will be installed in a directory called ./nano in a Linux
operating system. Please put the two downloaded packages there.
Similarly, if you install NanoDCAL in a MS-Windows machine, you
should put the two packages in some folder, say .\nano. Depending on
the license type, NanoDCAL can be installed in a single cpu, in a
parallel cluster or in a local area network (LAN).
Activating NANODCAL
To activate NANODCAL, sign up or sign in your account on the
Nanoacademic portal.
Go to the product section and click on NANODCAL.
Then click on the Start Your Free Trial button and you
should see a panel like Fig. 1
Fig. 1 Generate NANODCAL license.
Download the file license.lic by clicking the download link and copy
it in the directory $HOME/.nanoacademic/NANODCAL.
Alternatively, you may copy it anywhere and set
the environment variable NANODCAL_LICENSE_PATH as, say
export NANODCAL_LICENSE_PATH=/home/vincentm/licenses/license.lic
Warning
Important: Most licenses are floating licenses. If you require a different type of license, please contact the Nanoacademic team. For instance, for installation on a parallel cluster, the best way is to obtain the license-number at the front-end node of the cluster where you will install NanoDCAL and launch parallel runs. If Matlab is installed in a desktop computer rather than in your cluster, you have to install NanoDCAL on this desktop (where the Matlab resides) and then use the Matlab Compiler Runtime (MCR) environment to run NanoDCAL on the cluster. These issues are discussed below.
Unpacking nanodcal.tar.gz creates a directory /nanodcal containing the
software. In Linux, use tar -zxf to unpack. In MS-Windows, it is
suggested to use the utility 7-zip to unpack the file. In /nanodcal,
there is a subdirectory /neutralatomdatabase. Please put the downloaded
neutralatomdatabase.tar.gz or any pseudopotential set in there.
..You should also find a document summary.pdf about this database and the tests done.
The database will be updated from time
to time and announcements made on the client portal and
emailed to the users.
You are now ready to install NanoDCAL. Within Matlab, go to
/nanodcal. In the Matlab command window, type the following command:
nanodcal -install
If this is the first run of NanoDCAL on this computer, you will be prompted to accept an End User License Agreement. Please read and decide if you accept it. After accepting, the installation process continues.
Installation on a single computer
Once you have obtained the license.lic from Nanoacademic, please put it
in the directory $HOME/.nanoacademic/NANODCAL.
NanoDCAL is now installed. Congratulations!
Installation of parallel environment
NanoDCAL interfaces with standard MPI implementations such as OpenMPI. This section presents the installation of OpenMPI. The next section presents the installation of NanoDCAL, the compilation of NanoDCAL, the installation of the Matlab Compiler Runtime (MCR), and finally the setting of environmental variables in order to run parallel NanoDCAL. Because most parallel computations are done under the Linux (or unix) operating system, we shall only introduce the installation in Linux.
Before installation of OpenMPI, please make sure that ssh or rsh has already been installed and you can login to each node of the computer cluster without password as required by OpenMPI.
Matlab has its own parallel toolboxes which are the Parallel Computing Toolbox and MATLAB Distributed Computing Server. In them there is an mpi library which may cause conflict with NanoDCAL. If this happens, please try again after disabling these toolboxes.
Pre-existing MPI installation
Many platforms are now accessible with several MPI implementations
preinstalled. Adding OpenMPI to one’s environment usually proceeds as
follows. The platform has the module command for instance. Then the
OpenMPI installations can be listed as
username@computer:~$ module spider openmpi

--------------------------------------------------------------
   openmpi:
--------------------------------------------------------------
      Description:
      An open source Message Passing Interface implementation

      Versions:
         openmpi/3.1.3
         openmpi/4.0.1
         openmpi/4.0.3
         openmpi/4.1.1
OpenMPI is then simply loaded typing
module load openmpi/4.0.3
spack installation
If you need to install OpenMPI yourself, the simplest way is probably to
use a package manager like spack. This section shows how to install
the build tools and dependencies using the spack package manager.
Get spack from the github repository typing
git clone https://github.com/spack/spack.git
and add it to your environment as follows
source spack/share/spack/setup-env.sh
You may add the last command to your .bashrc to make this permanent.
Copy spack.yaml file found in documentation and activate the
package extension.
cd $NANODCAL_DIR
cp documentation/spack.yaml .
spacktivate .
GCC and OpenMPI are usually already installed on computing
platforms. You may tell spack to use preinstalled compilers and
libraries as follows
spack find compiler
spack external find OpenMPI
Next, concretize the environment and let spack build the
dependencies as follows
spack concretize -f
spack install -j8
You may adjust the build parallelism using the -j option (here I use
8 cores). When using nanodcal, just activate the environment with
spacktivate .
If something goes sideways, try to find a local version (e.g. with
perl) and reconcretize
spack external find perl
spack concretize -f
Manual OpenMPI installation
If you will use OpenMPI for parallel computation, please follow this Section. From the website, one can obtain more information about OpenMPI and download the package. Please install version 4.0.3 of OpenMPI.
Step 1 – preparation
One needs a copy of OpenMPI and a C compiler. Please download
openmpi-4.0.3.tar.gz from the OpenMPI website. For the C compiler,
simply use gcc which is a standard compiler for Linux system. Search the
gcc package in the Linux CD and install it if you have not done so.
Step 2 – install OpenMPI
Unpack the tar file:
tar zxf openmpi-4.0.3.tar.gz
If your tar command does not accept the z option, use:
gzip -d openmpi-4.0.3.tar.gz
tar xf openmpi-4.0.3.tar
Go to the source directory and type at the command line:
./configure prefix=$HOME/openmpi CC=gcc CFLAGS=-fPIC
The prefix option is to appoint the installation path. The CC option is to appoint the C compiler. If you use the gcc package, you do not need the
CCoption. TheCFLAGSoption is necessary because the Matlab library needs this option. After this configuration, you can compile and install OpenMPI:make make installSetup the OpenMPI environment, i.e. setup binary and library paths for OpenMPI:
export PATH=$HOME/openmpi/bin:$PATH
export LD_LIBRARY_PATH=$HOME/openmpi/lib:$LD_LIBRARY_PATH
For more information about the OpenMPI installation, please read the FAQ of OpenMPI on its website.
Installation of parallel NanoDCAL
We are now ready to install parallel NanoDCAL. Since a parallel cluster can be configured in many different ways, we shall first use a typical configuration for our discussion and the idea is the same for other similar configurations. The typical configuration is shown in Fig. 2 which consists of a front-end node plus many client nodes, connected by some switch box and the NFS file system is used. Some other different situations will be discussed later.
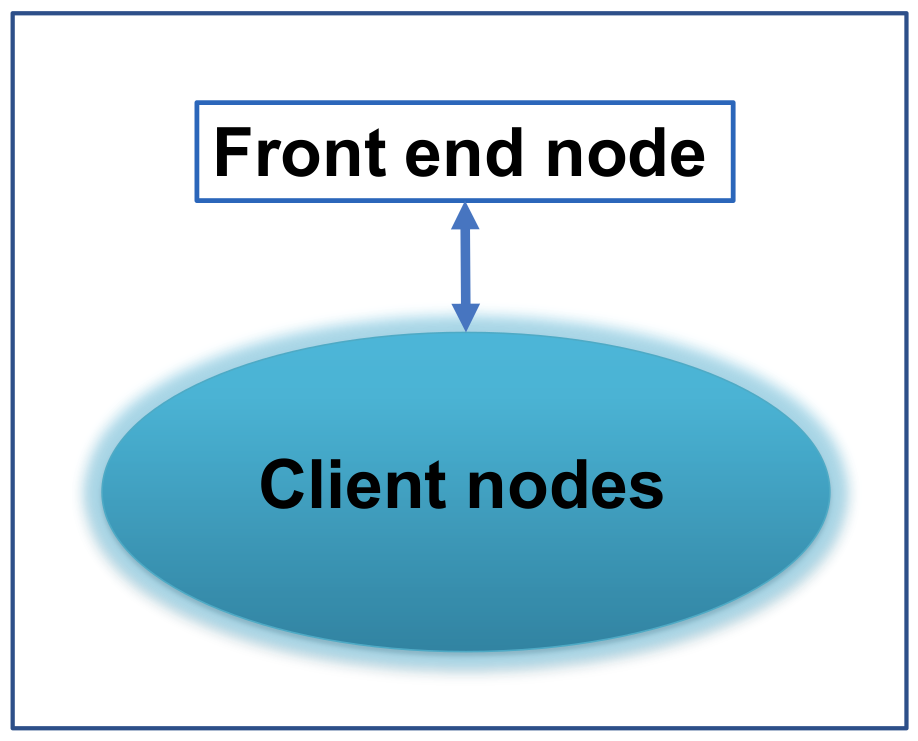
Fig. 2 Schematic plot of a parallel cluster, consists of a front end node and many client nodes.
Assuming a copy of Matlab is installed and works on the front end node of the parallel cluster (see Fig. 2). If your Matlab is installed elsewhere, see Section 2.6. Again, we assume you have gcc. Please go through the following steps to install NanoDCAL on the front-end node of your computer cluster:
To setup the C compiler, start Matlab and in its command window, issue the following command:
mex -setupChoose gcc for Linux.
Assuming you have already received a license file
license.licfrom Nanoacademic (see Section 2.1), put it in directory$HOME/.nanoacademic/NANODCAL. If you cannot use floating license because, say, the computer cluster or some nodes do not have access to Internet, contact the Nanoacademic team which will provide alternate licensing options.
If you have Matlab licenses for every node of the parallel cluster, namely for the front-end node as well as all the client nodes, the parallel NanoDCAL is now installed. Congratulations!
However, a researcher may own one or several Matlab licenses but wish to run parallel NanoDCAL on a parallel cluster with large number of nodes. For this case one needs to compile NanoDCAL.
Compiling NanoDCAL
As noted, a researcher may own less number of Matlab licenses than the number of nodes of the parallel cluster. In order to run parallel NanoDCAL using all the nodes, one needs to compile NanoDCAL using the Matlab Compiler toolbox. Matlab Compiler packs NanoDCAL into a stand alone executable that can be run on any number of nodes. After compilation, the executable is called NanoDCAL in Linux, and nanodcal.exe in MS-Windows. Compilation is necessary if you do not have enough Matlab licenses to cover all the nodes. Please consult Mathworks website to acquire a Matlab Compiler toolbox.
Assume your Matlab with the Matlab Compiler toolbox is installed at the front-end node of the cluster (Fig. 2), please also make sure that NanoDCAL can run on the front-end node. If your Matlab is installed elsewhere, please read Section 2.6 In the Matlab command window, type the following to compile NanoDCAL:
mcc -m nanodcal -a classes -a license -d bin
Here, the -a option means adding a folder to the CTF archive. The folder
classes is necessary as it includes all the NanoDCAL codes.
.. The folder license is necessary because it includes the license.lic and
.. ip.dat which are needed for running parallel NanoDCAL.
The -d option will redirect all outputs in the bin directory.
There are some other folders which may be useful but not necessary to
copy during the above compilation. First, the folder
nanodcal/generaldata contains help information which is not needed to
run parallel NanoDCAL. If you do need help information, this folder
can be added to the CTF archive using the -a option in the command line
during the above compiling process. Second, the folder
nanodcal/neutralatomdatabase contains atomic orbital database, this
should not be copied to the CTF archive because it is a large file. But
if you must have it in the CTF for some reason, please use the -a option
in the command line during the above compiling process. In fact, the
atomic orbital database is only needed for your research project, and
not needed in the compilation of the NanoDCAL code. Finally, the
folder nanodcal/autotests contains autotest examples which are not
needed during compilation. But if you need these autotest examples to
test parallel runs, you must add this folder to the CTF archive by the
-a option in the command line during the above compiling process.
Finally, we note that installing any software on a parallel environment may need some work and help with the systems managers. It is quite possible that your computer already has OpenMPI. If you have difficulties, please bring this installation guide to your system manager. If you still have difficulties, please leave messages at Nanoacademic forum or email to support@nanoacademic.com. In your messages, please copy the error messages received during the installation process.
After NanoDCAL is compiled, you can launch the executable at the front-end node of the cluster and run as many nodes as you wish, see Fig. 2 above. However, there is one last step you need to do which is to setup path variables for the compiled NanoDCAL.
Setting path variables
Setting environmental path variables at the front-end node is for the client nodes to see (through NFS) the NanoDCAL residing on the front-end node (Fig. 2). Understandably, the compiled NanoDCAL (the executable) becomes dependent of the version of Matlab and version of the operating system. It is crucial to set the environment variables correctly in order to run parallel NanoDCAL on all the nodes. Complete information of these variables can be found in the Matlab Compiler manual. Please read it before installation because the environment variables may be slightly different for different versions of Matlab. In the Matlab Compiler manual, at the “Reference Information” you can find two sections, “Directories Required for Development and Testing” and “Directories Required for Run-Time Deployment”. How to set environment variables for your version of Matlab can be found there.
Assuming you have a parallel computer cluster in a typical configuration as in Fig. 2, where the front-end node has a Matlab and a Matlab Compiler Toolbox. You have installed NanoDCAL at this front-end node and compiled it there.
The following is an example for setting the environment variables on the front-end node, using Matlab 2010a and Linux x86-64 as example. Again, the front-end node is where your Matlab and Matlab Compiler Toolbox are installed and your NanoDCAL compiled. Please type the lines below
export MATLABROOT=$HOME/MatlabR2010A
export LD_LIBRARY_PATH=$MATLABROOT/runtime/glnxa64:$LD_LIBRARY_PATH
export LD_LIBRARY_PATH=$MATLABROOT/bin/glnxa64:$LD_LIBRARY_PATH
export LD_LIBRARY_PATH=$MATLABROOT/sys/os/glnxa64:$LD_LIBRARY_PATH
export LD_LIBRARY_PATH=$MATLABROOT/sys/java/jre/glnxa64/jre/lib/amd64/native_threads:$LD_LIBRARY_PATH
export LD_LIBRARY_PATH=$MATLABROOT/sys/java/jre/glnxa64/jre/lib/amd64/server:$LD_LIBRARY_PATH
export LD_LIBRARY_PATH=$MATLABROOT/sys/java/jre/glnxa64/jre/lib/amd64:$LD_LIBRARY_PATH
export XAPPLRESDIR=$MATLABROOT/X11/app-defaults
Your parallel NanoDCAL is now installed, congratulations!
From now on, you can launch parallel NanoDCAL runs at the front-end node and use as many client nodes as you wish. We have so far assumed that the file system of the cluster is NFS so that all the client nodes can see the files on the front-end node (see Fig. 2), therefore only one copy of NanoDCAL executable is needed and it is located at the front-end node. As well, you only need to setup the environment variables at the front-end node. If for some reason that your client nodes cannot see the files of the front-end node, you will need to copy the NanoDCAL executable to and setup environment variables on all the client nodes. You also need to copy your research project input files (see below) to exactly the same directory on all your client nodes with exactly the same path. The situation becomes quite system specific and please speak to your system managers. If you have a cluster which has no front-end node but uses NFS, you can treat the particular node where NanoDCAL has been compiled as if it is the front-end node. Do the same as discussed so far and you can launch parallel NanoDCAL run from this particular node. In fact you can log into any node and launch parallel NanoDCAL run after the environmental variables are set.
Launching parallel NanoDCAL
To launch a parallel NanoDCAL run, the command looks like:
mpirun -np 64 nanodcal -parallel project.input
Here, the switch ‘-np 64’ means 64 processors are requested; -parallel tells NanoDCAL to start a parallel task using 64 processors, and the input file for NanoDCAL is project.input. In large computer clusters or supercomputers, there is usually a queuing system. In the script which is submitted to the queue, you need to append the above command. Note that the syntax to launch parallel computation (e.g. mpirun) is system specific and you need to know what works for your parallel computer.
Use Matlab Compiler Runtime
So far we have assumed that your Matlab and Matlab Compiler toolbox are installed at the front-end node of the parallel cluster - this is recommended. However, it may happen that the Matlab and Matlab Compiler Toolbox are not installed in the front-end node, but in a separate desktop machine which is not part of the parallel cluster. In other words, the situation may look like that in Fig. 3.
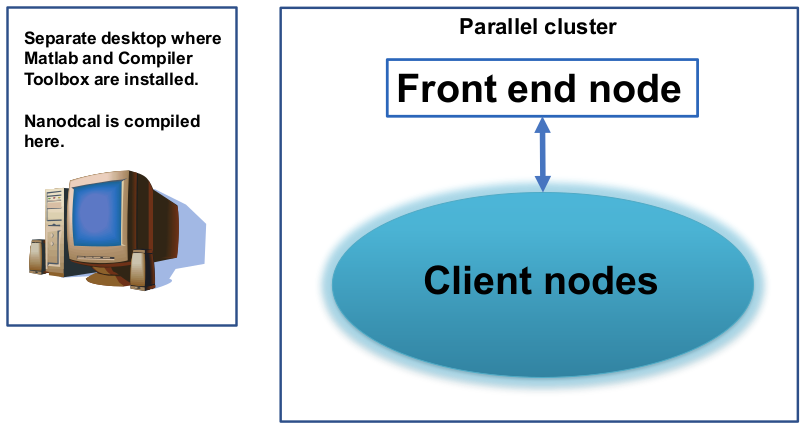
Fig. 3 Schematic plot of a parallel cluster, consists of a front end node and many client nodes. The Matlab and Matlab Compiler Toolbox are installed at a separate desktop computer. For this situation, MCR is needed to run parallel NanoDCAL.
In the case of Fig. 3, one wishes to run the compiled NanoDCAL in the cluster but the cluster has not installed the corresponding Matlab. To overcome this problem, you need to install the MATLAB Compiler Runtime (MCR) for this purpose. You also need to make sure that your desktop computer where NanoDCAL is compiled, has exactly the same version of the operating system as the cluster.
In the directory $HOME/MatlabR2010A/toolbox/compiler/deploy/glnxa64, you can find the MCR installation file MCRInstaller.bin. It is located in similar places for other versions of the Matlab Compiler toolbox. MCRInstaller.bin is an executable and MCR is installed by issuing command:
./MCRInstaller.bin
Please install it at the front-end node of the parallel cluster. After MCR is installed, set the environment variables at the front-end node by typing the lines shown below.
export MCRROOT=$HOME/MCR2010A/v713
export LD_LIBRARY_PATH=$MCRROOT/runtime/glnxa64:$LD_LIBRARY_PATH
export LD_LIBRARY_PATH=$MCRROOT /bin/glnxa64:$LD_LIBRARY_PATH
export LD_LIBRARY_PATH=$MCRROOT/sys/os/glnxa64:$LD_LIBRARY_PATH
export LD_LIBRARY_PATH=$MCRROOT/sys/java/jre/glnxa64/jre/lib/amd64/native_threads:$LD_LIBRARY_PATH
export LD_LIBRARY_PATH=$MCRROOT/sys/java/jre/glnxa64/jre/lib/amd64/server:$LD_LIBRARY_PATH
export LD_LIBRARY_PATH=$MCRROOT/sys/java/jre/glnxa64/jre/lib/amd64:$LD_LIBRARY_PATH
export XAPPLRESDIR=$MCRROOT/X11/app-defaults
Finally, copy the compiled NanoDCAL executable to the front-end node, you can launch parallel NanoDCAL as discussed above. Congratulations!
Installation of nanodcal on a LAN
A research group often maintains a local area network (LAN) connecting a number of desktop computers. If you have a NanoDCAL LAN license, you may run NanoDCAL on all the individual computers on the same LAN. The installation of NanoDCAL on a LAN is essentially the same as that for parallel cluster discussed above, but there is no need to install OpenMPI.
For LAN installation, one may install NanoDCAL at the server of the
LAN or at any desktop on the LAN.
Then, you start from the item (b) of
Section 2.4, namely putting the license.lic
into $HOME/.nanoacademic/NANODCAL.
If one has Matlab licenses for every computer on the LAN, the
installation of NanoDCAL is completed. In this case, if NanoDCAL
can be seen on each desktop of the LAN (for example, through NFS), you
can run it directly on each desktop on the LAN. Otherwise, you need to
copy NanoDCAL together with license.lic to each local
desktop.
If there are less number of Matlab licenses than the number of computers on the LAN, you need to do the same compilation and environment variable setting at the server machine of the LAN, the procedure is the same as that in Section 2.5. For LAN without a server, you need to install Matlab and Matlab Compiler toolbox on a particular desktop of the LAN, treat that machine as the server, install and compile NanoDCAL on this computer. If the compiled NanoDCAL and MCR can be seen on each desktop of the LAN (for example through NFS), you can run NanoDCAL directly on each desktop after setting the environment variables. Otherwise, you need to copy the compiled NanoDCAL executable and MCRinstaller.bin to each local desktop on the LAN, install MCR, set the environment variables on each desktop as discussed in Section 2.6.
Finally, the LAN setup is system specific. You may need to speak to the system manager to understand its setup. The procedure discussed here should be treated as a general guideline.
Final check
After NanoDCAL has been successfully installed in your computer, a final optional check of the installation can be initiated by running the autotest utility of NanoDCAL. In the Matlab command window, type:
nanodcal -autotest [-parallel]
Here the parameters in square brackets are optional, and the default value is medium. This allows NanoDCAL to self check the installation issues and making sure everything is correctly setup. The light, medium and heavy self check take roughly a few minutes, a few hours, and tens of hours to complete, respectively - depending on the power of your computer.
Installing any software in a parallel computer needs a bit of work since the process is related to the system details. If there are difficulties, please speak to your system managers who usually are able to resolve the issue. You are also welcome to communicate with us at Nanoacademic forum or email to support@nanoacademic.com.