1. QTCAD
This section describes how to install QTCAD and its dependencies.
1.1. Software requirements
QTCAD consists of Python libraries and thus requires a properly working Python installation. The recommended Python distribution for QTCAD is Miniconda, which may be installed using the instructions on the official conda website. This includes both Python and conda, the preferred package management tool for QTCAD installation.
QTCAD also uses mesh files as input. These mesh files can be produced with Gmsh. Following the conda QTCAD installation instructions below ensures that Gmsh is properly installed in the QTCAD virtual environment. In any situation where this is not possible, Gmsh may be installed by following the instructions on the official Gmsh website or in the next section. The official Gmsh website also contains Gmsh tutorials. Video tutorials on how to use Gmsh can also easily be found on YouTube.
Similarly, 3D meshes and geometry files may be generated from 2D layouts using the Python API coded in the QTCAD Builder module of QTCAD, which provides significant flexibility in defining complex 3D geometries using operations emulating device fabrication. Alternatively, you may use our legacy package devicegen. The installation of devicegen is explained in the devicegen installation page.
Remark that while QTCAD is a commercial proprietary software, all its dependencies specified above are available for free.
1.2. Hardware requirements
Precise hardware requirements are strongly dependent on the complexity of the problem being solved both in terms of size of the mesh and solvers being employed. Therefore, it is quite non-trivial to provide universal hardware requirements for QTCAD.
Instead, below, we give two examples of systems on which QTCAD simulations may be run successfully. The first system is a laptop which may be used to run basic simulations for meshes with up to approximately 200,000 nodes that define simple devices with one or two quantum dots. This system uses a processor that dates back from 2015 and should be interpreted as a minimal setup. The second system is a more advanced desktop workstation which we routinely use for complex simulations using meshes with up to approximately 2,000,000 nodes.
These configurations should be understood as typical system examples, and not as hard requirements. We have indeed successfully run QTCAD on a wide variety of systems (Windows, Mac, or Linux laptops, desktop workstations, cloud computing services, HPC clusters, etc.). Since computation times depend non-trivially on many factors such as the hardware being used, number of cores employed, solver, mesh dimension, convergence properties of the problem being studied, tolerance of the solvers, or basis-set dimension (in the case of the many-body solver), they are not given here. Instead, we encourage users to experiment on their machine with our tutorials and practical applications for spin qubits, or with our tutorials for superconducting circuits. Nevertheless, for simulations of typical few-electron single or double quantum-dot devices, a laptop or a desktop computer should suffice, and HPC clusters should not be necessary.
1.2.1. System 1 (laptop)
CPU |
6th Gen Intel® Core™ i5-6300U @ 2.40GHz
|
GPU |
No discrete GPU, only integrated graphics
|
RAM |
8 GB |
HDD |
256 GB (SSD) |
OS |
Windows 10 |
1.2.2. System 2 (desktop)
CPU |
13th Gen Intel® Core™ i9-13900K @ 3.00 GHz
|
GPU |
None |
RAM |
128 GB |
HDD |
1 TB (SSD) |
OS |
Linux (Ubuntu distribution) |
1.2.3. Operating system
We officially support the following operating systems:
Windows
Linux
macOS
1.3. Downloading QTCAD
To download QTCAD, please visit the Nanoacademic client portal at
https://portal.nanoacademic.com/
If you already have a Nanoacademic account, please log in using your password.
Otherwise, please create your account, and then log in.
If this was not already done, please proceed to fill in the required user profile information (name, email address, institution, phone number, etc.).
Once you have a valid profile, please click on the “Products” section and select QTCAD. You should then see the following page:
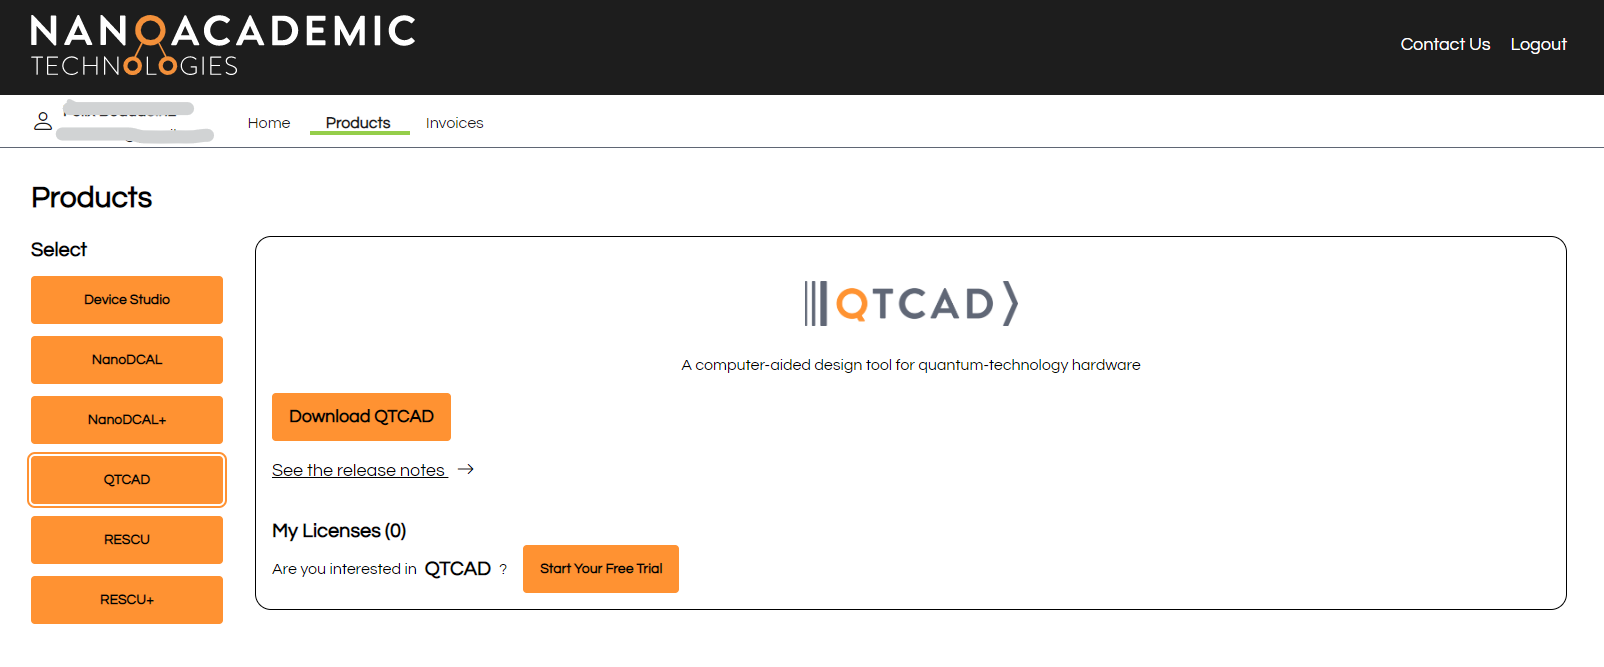
Fig. 1.3.1 Getting a free QTCAD trial version
Click on “Start your free trial”.
You will then see the following page which will allow you to download your license.
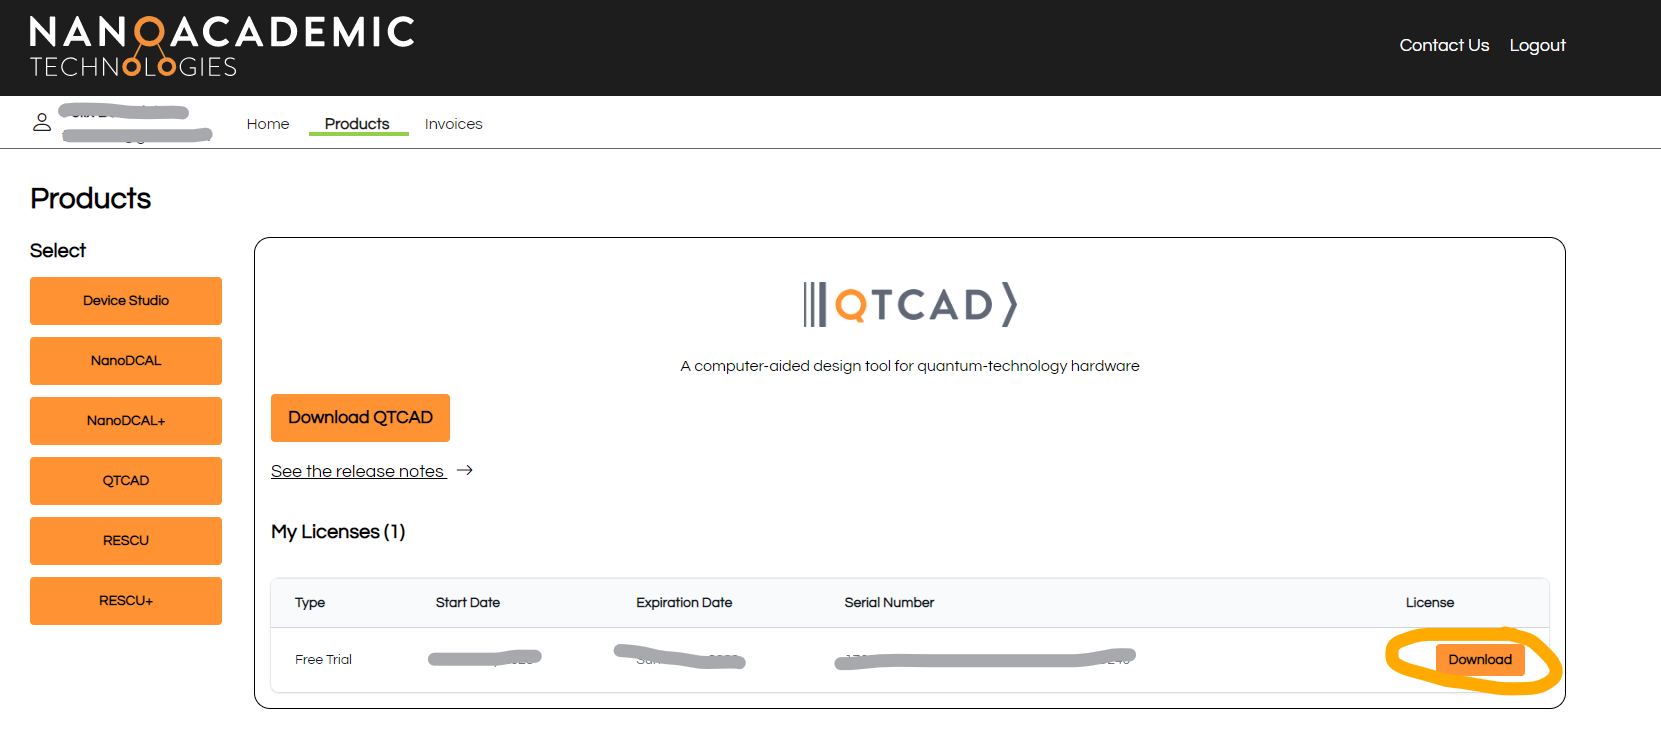
Fig. 1.3.2 Downloading a free trial license of QTCAD
This will produce a file called license.lic which we discuss further
in the License Activation page.
Alternatively, you can use the qtcadcli tool to automatically download your
license and install it in the default location on your machine.
This method is described in the Activating the license section.
Before using qtcadcli, make sure you have completed the installation steps
so that the tool is available from your terminal.
1.4. Package installation with conda (recommended)
1.4.1. Setting up conda
Assuming that Miniconda (or Anaconda) is installed on your machine as recommended in the Software requirements section, it is good practice to make sure that you are using the latest version of conda. This will help speed up environment resolution. If you already have conda installed, please make sure that the following command is run in your terminal:
conda update -n base conda
Depending on the version of conda installed on your machine, this command may not update the environment as expected. If your conda environment is not updated, please reinstall conda, version 23.10 or later.
QTCAD is distributed as a Conda package. Choose the installation method that corresponds to your distribution source.
1.4.2. Local Installation (Client Portal ZIP)
If you have received a ZIP distribution from the Nanoacademic web portal, follow these steps to install QTCAD.
1. Extract the ZIP archive
Replace <qtcad_zip> with the name of the file you downloaded.
Linux / macOS (Bash/Zsh):
unzip <qtcad_zip>.zip -d <qtcad_zip>
Windows (PowerShell):
Expand-Archive -Path <qtcad_zip>.zip
2. Navigate to the root directory
Enter the directory created after extraction:
cd <qtcad_zip>
3. Create the conda environment
Execute the command corresponding to your terminal:
Linux (Bash/Zsh) / Windows (PowerShell):
conda create -n qtcad -y -c "$PWD/channel" -c conda-forge qtcad
Windows (Command Prompt):
conda create -n qtcad -y -c "%CD%\channel" -c conda-forge qtcad
macOS (Bash/Zsh):
If you are using a Mac with an Arm processor (Apple Silicon), please install Rosetta before proceeding with the creation of an osx-64 environment, since some packages do not fully support Arm processors:
softwareupdate --install-rosetta
** RESTART YOUR SHELL **
CONDA_SUBDIR=osx-64 conda create -n qtcad -y -c "$PWD/channel" -c conda-forge qtcad
1.4.3. Post-Installation (Windows Only)
After creating the environment on Windows, you must set the following environment variable to avoid conflicts between OpenMP runtimes:
conda env config vars set KMP_DUPLICATE_LIB_OK="TRUE" -n qtcad
Note
This is necessary because Gmsh and QTCAD may rely on different OpenMP
implementations on Windows. By default, environments do not support multiple
implementations of OpenMP in the same process. Setting
KMP_DUPLICATE_LIB_OK=TRUE allows both libraries to coexist without
causing a fatal error.
1.5. Getting Started
Follow these steps to initialize your QTCAD environment and activate your license.
1.5.1. Step 1: Activate the Environment
conda activate qtcad
1.5.2. Step 2: Initialize License and Assets
Run the QTCAD CLI (Command Line Interface) to complete the setup:
qtcadcli
From the interactive menu (shown in the figure below):
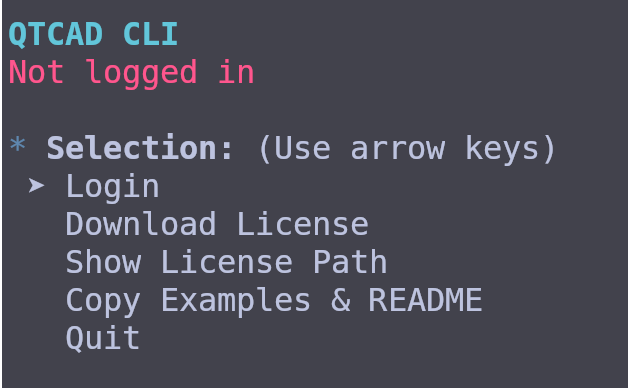
Fig. 1.5.1 The QTCAD CLI interactive menu
Select Download License to authenticate and retrieve your license. Alternatively, you can manually download your license from the
Nanoacademic portal(more details at Activating the license).(Optional) Select Copy Examples to populate your current directory with tutorials and sample projects.
It is recommended to copy the examples to a working directory of your choice
(e.g., your Documents folder) rather than the installation directory.
Once the examples are copied, you can also copy the README.md file to your
working directory for quick reference.
1.5.3. Additional installation instructions for Qiskit Metal
In order to use QTCAD in the Qiskit Metal workflow, you need to first complete the steps outlined above in the QTCAD installation-instructions section (Package installation with conda (recommended)) and then proceed to the section associated with your system:
Note
Please note that to run the code with the Qiskit Metal workflow, instead of
activating the qtcad environment, you will need to activate the Qiskit
Metal environment, named qiskit-metal in the instructions below.
Also note that you are free to select a different environment name instead
of “qiskit-metal” in step 3 in the instructions below.
However, the QTCAD renderer inside of Qiskit Metal assumes that the name
“qtcad” for the environment created when installing QTCAD
(Package installation with conda (recommended)) is left unchanged.
You can find instructions on how to use the QTCAD renderer if the name
of QTCAD’s environment has been modified in
this tutorial.
1.5.3.1. Qiskit Metal installation on Linux
Clone the fork of the Qiskit Metal repository, modified by Nanoacademic to support QTCAD as one of the renderers. The clone of the repository is assumed to be placed in some target installation directory (represented here by
installation_path_qm).git clone --depth 1 https://github.com/nanoacademic/qiskit-metal.git installation_path_qm/qiskit-metal
Enter the
qiskit-metaldirectory inside the installation directory.cd installation_path_qm/qiskit-metal
Create the virtual environment that will be used to run Qiskit Metal.
conda env update -f environment.yml -n qiskit-metal
Activate the virtual environment.
conda activate qiskit-metal
Install Qiskit Metal.
pip install --no-deps .
1.5.3.2. Qiskit Metal installation on macOS
Clone the fork of the Qiskit Metal repository, modified by Nanoacademic to support QTCAD as one of the renderers. The clone of the repository is assumed to be placed in some target installation directory (represented here by
installation_path_qm).git clone --depth 1 https://github.com/nanoacademic/qiskit-metal.git installation_path_qm/qiskit-metal
Enter the
qiskit-metaldirectory inside the installation directory.cd installation_path_qm/qiskit-metal
Create the virtual environment that will be used to run Qiskit Metal.
If you are using a Mac with an Intel x86_64 processor (usually machines from before 2021):
conda env update -f environment-mac.yml -n qiskit-metal
If you are using a Mac with an Arm processor (Apple Silicon), please install Rosetta, if you have not done so already, before proceeding with the creation of an osx-64 environment, since Qiskit Metal does not support Arm-based processors:
softwareupdate --install-rosetta
** RESTART YOUR SHELL **
CONDA_SUBDIR=osx-64 conda env create -f environment-mac.yml -n qiskit-metal
Also, make sure to restart your shell after installing Rosetta.
Warning
If you already have a Qiskit Metal osx-64 environment set up on your Mac with an Arm-based processor, you would only need to run
conda env update -f environment-mac.yml -n qiskit-metal
Activate the virtual environment.
conda activate qiskit-metal
Install Qiskit Metal.
pip install --no-deps .
1.5.3.3. Qiskit Metal installation on Windows
Clone the fork of the Qiskit Metal repository, modified by Nanoacademic to support QTCAD as one of the renderers. The clone of the repository is assumed to be placed in some target installation directory (represented here by
installation_path_qm).git clone --depth 1 https://github.com/nanoacademic/qiskit-metal.git installation_path_qm/qiskit-metal
Enter the
qiskit-metaldirectory inside the installation directory.cd installation_path_qm/qiskit-metal
Create the virtual environment that will be used to run Qiskit Metal.
conda env update -f environment.yml -n qiskit-metal
Activate the virtual environment.
conda activate qiskit-metal
Install Qiskit Metal.
pip install --no-deps .
1.6. Troubleshooting
If you encounter any issues during the installation process, please contact Nanoacademic for support. We will be happy to help you resolve any problems you may encounter. You may also first look at the Troubleshooting page to see if your issue is already addressed.
1.7. Package installation with pyenv (not recommended)
It is strongly recommended to install QTCAD using conda (Section 1.4).
However, some high-performance computing (HPC) clusters may not allow a conda install for various reasons (technical or administrative).
In these situations, installation with pyenv may be attempted despite the above recommendation.
If you need to install QTCAD through pyenv or any approach different from the
default conda installation method, please contact Nanoacademic to get the
required support. For example, the requirements.txt file included with
QTCAD for pyenv installations may have to be manually tailored to your
workstation and operating system.
1.7.1. Linux and macOS
1.7.1.1. Installing pyenv
Before installing pyenv, it is useful to make sure that the recommended build environment is first put in place.
To install pyenv, an automatic installer is available on the official pyenv GitHub webpage.
If you prefer to manually clone the pyenv git repository, please follow these instructions, and then make sure to correctly set up your shell environment according to the procedure described after the section linked above.
After installing pyenv, a necessary next step to proceed with the QTCAD installation instructions that follow is to install the pyenv-virtualenv plugin of pyenv.
Note that if the automatic installer was used, this plugin may already have
been installed. In this case, assuming that pyenv was installed in a standard
directory, a directory called pyenv-virtualenv will be
found in $HOME/.pyenv/plugins/.
1.7.1.2. Installing QTCAD dependencies
Install the Python 3.10 interpreter with
pyenv install 3.10.0
Create a virtual environment for QTCAD using the Python 3.10 interpreter with
pyenv virtualenv 3.10.0 qtcad
Activate the
qtcadenvironment withpyenv shell qtcad
The list of virtual environments can be shown with
pyenv virtualenvs
A typical output will look like
3.10.0/envs/qtcad (created from /home/user/.pyenv/versions/3.10.0)
* qtcad (created from /home/user/.pyenv/versions/3.10.0)
Here, the asterisk (*) indicates that the active environment is the
qtcadenvironment.Install the packages specified in the
requirements.txtfile using pip withpip install -r requirements.txt
1.7.1.3. Installing QTCAD
Finally, QTCAD itself is installed with
pip install .
After installation, QTCAD may be launched simply by activating the qtcad
virtual environment (step 3 in Section 1.7.1.2). It should then be
possible to run Python scripts that call any of the QTCAD packages.
1.7.2. Windows
pyenv is not officially supported in Windows. A Windows version called pyenv-win exists, but was not tested by Nanoacademic. Please contact Nanoacademic if you need to install QTCAD on Windows with any approach other than the recommended conda approach.