Note
Go to the end to download the full example code.
Importing CAD models
In this brief example, we demonstrate how to import pre-made CAD models.
We first initialize a new instance of qtcad.builder.Builder
and create a box for reference.
from qtcad.builder import Builder, Direction, Polygon, Mask
from pathlib import Path
import sys

script_dir = Path(sys.argv[0]).resolve().parent

box = Polygon.box(10, 10).centered()
default_mask = Mask("default", shapes=[box])

builder = (
    Builder()
    .add_mask(default_mask)
    .use_mask("default")
    .extrude(3)
    .view(
        angles=(-45, 0, 0),
        volume_labels=True,
        surface_labels=True,
        surfaces=True,
        save="figs/default_shape.svg",
    )
)
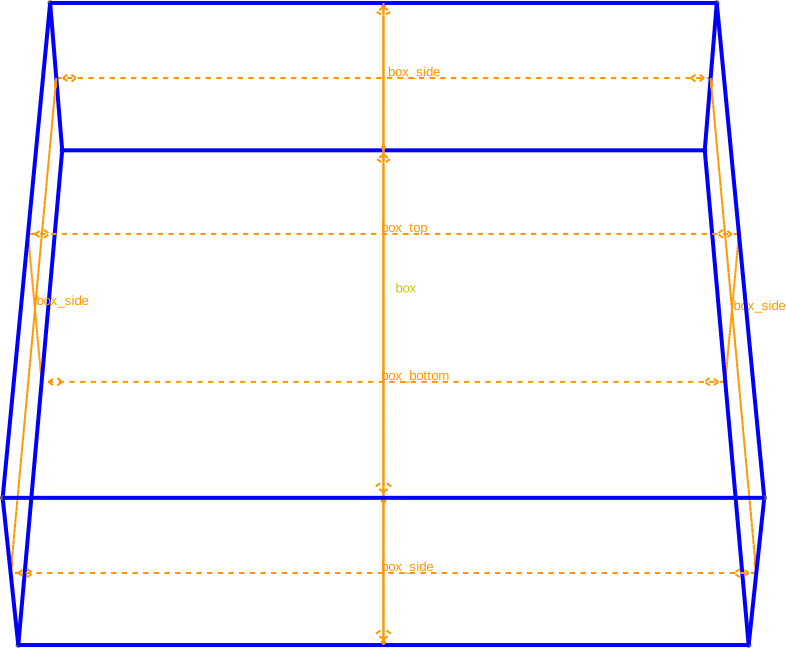
[02:50:16 PM] INFO     Auto-named Polygon instance to 'box'            masks.py:240
[14:50:16] INFO     Using mask 'default' (implicitly selecting      _builder.py:827
                    shapes [Polygon 0 'box'])
           INFO     Extruding shape 0 from mask 'default' with     _builder.py:2895
                    name 'box' by 3 at z=0
           INFO     Creating new physical group of dimension 2     _builder.py:2679
                    with name 'box_bottom'
           INFO     Creating new physical group of dimension 2     _builder.py:2679
                    with name 'box_side'
           INFO     Creating new physical group of dimension 2     _builder.py:2679
                    with name 'box_top'
           INFO     Creating new physical group of dimension 3     _builder.py:2679
                    with name 'box'
           INFO     Setting z-coordinate to 3                       _builder.py:929
           INFO     Saving figure                                  _builder.py:1994
We then import a CAD model from a STEP file using qtcad.builder.Builder.import_model.
- Builder.import_model(file_path: str | Path, format: str = '', translate: Iterable[float] | None = None, scale: float = 1.0, rotate: float = 0.0, rotation_axis: Iterable[float] | str = Direction.z) Self
[🏗️ Operation] Import a Gmsh model from file
file_path. The model can be in any format that Gmsh supports (e.g..iges,.step,.brep).- Parameters:
file_path – The path to the file to import.
format – The format of the file. If empty (default), the format will be guessed from the file extension. Can be “iges”, “step”, “brep”.
translate – If provided, a 3-vector by which to translate the model after import.
scale – Scaling factor to apply to the model after import.
rotate – Angle in degrees by which to rotate the model around its centre of mass.
To set the name of the resulting volume group (and surface groups),
we use set_group_name before importing.
(
    builder.set_group_name("imported_shape")
    .overlay_mode()
    .import_model(
        script_dir / "models" / "demo.STEP",
        rotation_axis=Direction.x,
        rotate=90,
        scale=0.07,
        translate=(0, 0, 3),
    )
    .view(
        angles=(-45, 0, 0),
        volume_labels=True,
        surface_labels=True,
        surfaces=True,
        save="figs/imported_shape.svg",
        font_size=5,
    )
)

[14:50:17] INFO     Importing model from                            _builder.py:734
                    /home/hiro/Documents/roam_code/code/qtcad_flake
                    /qtcad/packages/builder/examples/operations/mod
                    els/demo.STEP
           INFO     Creating new physical group of dimension 2     _builder.py:2679
                    with name 'imported_shape_bottom'
           INFO     Creating new physical group of dimension 2     _builder.py:2679
                    with name 'imported_shape_side'
           INFO     Creating new physical group of dimension 2     _builder.py:2679
                    with name 'imported_shape_top'
           INFO     Creating new physical group of dimension 3     _builder.py:2679
                    with name 'imported_shape'
           INFO     Identifying potential intersections...        fragmenter.py:290
[14:50:18] INFO     Fragmenting...                                fragmenter.py:320
           INFO     Creating new physical group of dimension 2     _builder.py:2679
                    with name 'box.imported_shape_side'
           INFO     Creating new physical group of dimension 2     _builder.py:2679
                    with name 'box.imported_shape_bottom'
           INFO     Creating new physical group of dimension 3     _builder.py:2679
                    with name 'box.imported_shape'
           INFO     Creating new physical group of dimension 2     _builder.py:2679
                    with name 'box_top.imported_shape'
           INFO     Saving figure                                  _builder.py:1994

<qtcad.builder.builder.Builder object at 0x7ff52109b8c0>
Note that the resulting surfaces are automatically labeled base on
their orientation. The imported shape is integrated into the
existing geometry according to the current
qtcad.builder.GroupingMode (see also Extrusion and fragmentation modes).
Total running time of the script: (0 minutes 5.720 seconds)